
The Drafty Winter Reality Many Homeowners Know
It’s a familiar winter scene for many Canadian homeowners. The thermostat is set to a comfortable temperature, yet the living room still feels chilly. You walk past a window and feel a subtle stream of cold air. The floor near the exterior wall feels colder than the rest of the room. Meanwhile, your heating bill continues to climb month after month.
Many people assume their furnace or insulation is the problem. Sometimes that’s true. But in a surprising number of homes, the real issue is something less visible: air leakage.
Tiny gaps around windows, attic penetrations, electrical boxes, plumbing openings, and foundation joints allow warm indoor air to escape while cold outdoor air sneaks inside. Over time, these leaks can significantly increase heating costs and reduce comfort.
This is where air sealing comes in. Properly sealing the hidden gaps in your home’s building envelope is one of the most effective ways to reduce heating bills, improve comfort, and prepare your home for future energy upgrades.
What Air Sealing Actually Means
Air sealing is the process of identifying and closing unintended openings in your home’s building envelope the surfaces that separate indoor space from the outdoors.
These leaks may be small individually, but collectively they can equal the size of an open window.
Common air leakage points include:
Attic hatch or attic access doors
Pot lights and electrical boxes in ceilings
Plumbing and wiring penetrations
Gaps around windows and doors
Baseboards on exterior walls
Basement rim joists
Exhaust fan openings
Chimney and flue penetrations
When warm indoor air escapes through these openings, the heating system must work harder to maintain temperature. At the same time, cold outside air infiltrates the home.
In cold climates like Ontario, this cycle can account for a significant portion of winter heat loss.
Air sealing addresses the root of the problem by tightening the building envelope so conditioned air stays where it belongs.
Why Air Sealing Matters in Canadian Homes
Homes in Canada experience large temperature differences between indoor and outdoor environments during winter. The greater this difference, the stronger the pressure pushing warm air out through leaks.
This phenomenon, known as the stack effect, causes warm air to rise and escape through attic leaks while cold air is pulled in through the basement or lower floors.
As a result, many homeowners experience:
Cold floors on the main level
Drafts near windows and outlets
Uneven temperatures between floors
Ice dams forming on roofs
High heating bills
Proper air sealing a home in Canada helps reduce these issues by controlling the airflow pathways that allow heat to escape.
Typical Cost of Air Sealing in Ontario
The cost of air sealing depends on the size of the home, accessibility of problem areas, and whether the work is done during other renovations.
Typical ranges in Ontario include:
Basic targeted air sealing
$500 – $1,500
Sealing attic penetrations, weatherstripping, small gaps
Comprehensive professional air sealing
$1,500 – $4,000+
Includes attic work, basement rim joists, blower door testing
If attic insulation upgrades are being done at the same time, air sealing is often included in the scope of work.
While this might sound like a modest upgrade, its impact can be significant.
Energy Savings and Return on Investment
Air sealing is often considered one of the highest return energy upgrades available to homeowners.
In many cases, properly sealing a home can reduce heating energy consumption by 10–20%, depending on how leaky the building was to begin with.
Benefits include:
Lower heating bills
Improved indoor comfort
Reduced drafts
More consistent temperatures between rooms
Better performance from existing insulation
Unlike equipment upgrades, air sealing also improves the effectiveness of every other energy measure in the home.
For example:
Insulation works better in an airtight attic
Heat pumps operate more efficiently in a sealed home
Ventilation systems perform as designed
Because of these compounding benefits, home air leakage solutions are often recommended as an early step in energy retrofit plans.
Common Air Sealing Mistakes Homeowners Make
While many air sealing tasks appear simple, mistakes can reduce effectiveness or even create new problems.
Here are some of the most common issues professionals encounter.
1. Sealing the Wrong Areas First
Many homeowners start by replacing windows when the biggest leaks are actually in the attic.
In most homes, attic air leakage accounts for the majority of heat loss.
2. Ignoring Basement Rim Joists
The joint where the house frame meets the foundation is one of the most common leakage areas.
Sealing and insulating rim joists can dramatically reduce drafts on the first floor.
3. Skipping a Blower Door Test
Without testing, it’s difficult to know where the largest leaks actually are.
Energy advisors often use blower door testing to identify air leakage pathways before sealing begins.
4. Over-Sealing Without Ventilation
While tighter homes are more efficient, they must also maintain healthy indoor air quality.
Modern retrofit strategies often include balanced ventilation systems when homes become significantly more airtight.
Step-by-Step: How to Approach Air Sealing
For homeowners feeling overwhelmed, the key is to approach the upgrade in a logical sequence.
Step 1: Consider an Energy Assessment
An energy audit can identify where your home is losing the most heat.
This often includes:
Thermal imaging
Air leakage measurement
Step 2: Seal the Attic First
Attics are typically the largest source of heat loss.
Important tasks include:
Sealing wiring and plumbing penetrations
Weatherstripping attic hatches
Sealing around recessed lights
Closing gaps around ductwork
Step 3: Address Basement Leakage
Basements are often overlooked but can contribute significant cold air infiltration.
Focus areas include:
Rim joists
Sill plate gaps
Utility penetrations
Step 4: Improve Windows and Doors
Once major structural leaks are addressed, smaller improvements help fine-tune comfort.
Examples include:
Weatherstripping doors
Sealing window frames
Installing draft blockers
Step 5: Combine Air Sealing with Insulation
Air sealing and insulation should always work together.
Insulating without sealing air leaks first is like wearing a thick coat with the zipper open.
Rebates and Incentives in Ontario and Canada
Many homeowners are surprised to learn that air sealing improvements may qualify for energy efficiency incentives.
Programs across Canada often support upgrades such as:
Home energy assessments
Programs change periodically, but homeowners may find support through:
Federal efficiency programs
Provincial energy initiatives
Utility rebate programs
An energy advisor can often help determine eligibility before work begins.
When Air Sealing Makes the Most Sense
Air sealing is especially worthwhile if your home experiences:
Noticeable drafts in winter
High heating bills relative to similar homes
Uneven temperatures between floors
Cold floors or walls
Ice dams forming on the roof
Homes built before modern energy codes are particularly likely to benefit.
Even homes built in the 1990s and early 2000s often contain hidden leakage pathways that were never fully sealed during construction.
When Air Sealing Might Not Be the First Priority
Although air sealing is highly beneficial, it may not always be the immediate upgrade.
For example:
If the heating system is failing or extremely inefficient
If major structural repairs are needed first
If the home already underwent deep energy retrofits recently
In those situations, air sealing may still be part of the plan but scheduled alongside other improvements.
How Air Sealing Fits Into a Net Zero Roadmap
For homeowners thinking about long-term energy upgrades, air sealing is one of the most important early steps.
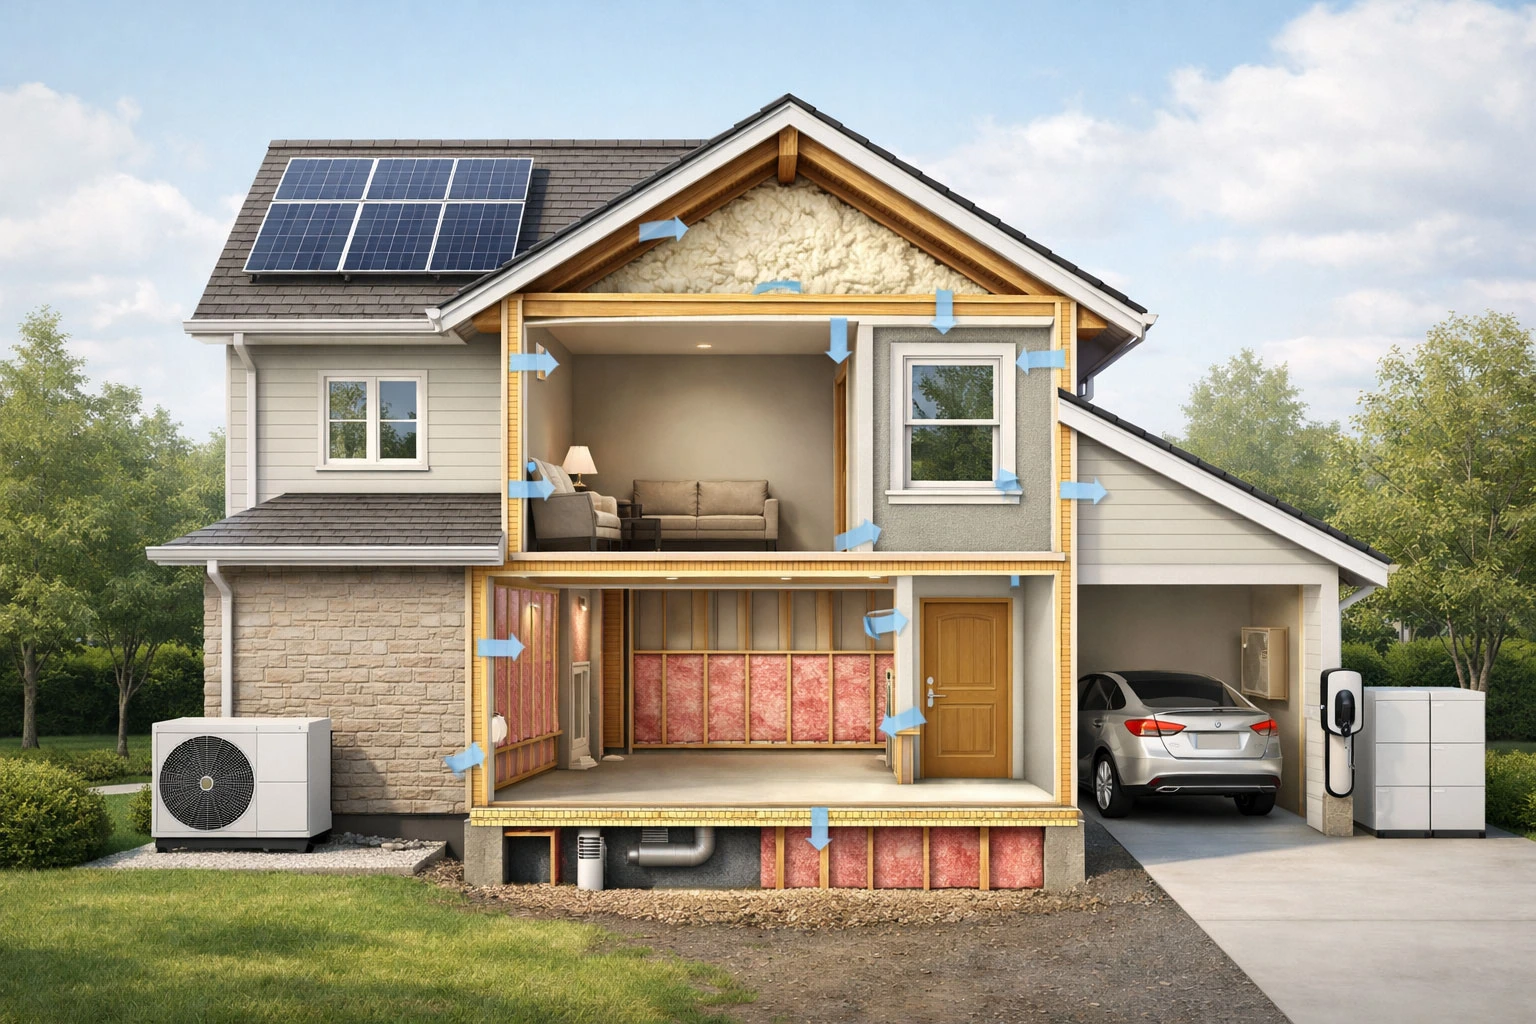
A typical Net Zero upgrade pathway often looks like this:
Air sealing improvements
Attic and wall insulation upgrades
High-efficiency windows (if needed)
Heat pump installation
Solar panel integration
Battery storage or EV charging support
By reducing heat loss first, the home requires less energy overall. That means smaller heating systems, lower operating costs, and easier integration of renewable energy.
In other words, air sealing helps every future upgrade perform better.
Final Thoughts
If your home feels drafty, unevenly heated, or expensive to warm in winter, the problem may not be your heating system at all.
Small air leaks scattered throughout the building envelope can quietly drain heat and increase energy costs year after year.
Fortunately, air sealing is one of the most practical and cost-effective ways to reduce drafts in Ontario homes and improve overall comfort.
When done strategically especially alongside insulation upgrades it can significantly reduce heating demand while preparing the home for future energy improvements.
Book a Personalized Home Upgrade Consultation
Every home is different, and the best energy upgrades depend on your building, budget, and long-term goals.
If you’re considering air sealing your home in Canada or planning a broader energy retrofit, the team at Net Zero Homes Consulting can help you create a clear, step-by-step upgrade roadmap.
Book a consultation today to receive a customized plan designed to improve comfort, reduce energy costs, and move your home closer to Net Zero performance.